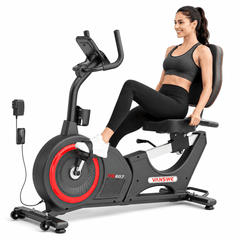
Pelvis and back
Keep the pelvis at the back of the seat and maintain comfortable contact with the backrest. Avoid sliding forward as resistance increases.

A recumbent exercise bike is one of the best low-impact cardio machines for home use, especially for seniors, beginners, and those with joint pain. Its reclined seat and backrest provide full lumbar support, reduce pressure on the knees and hips, and make it safer than upright bikes. This comfort-focused design helps users stay consistent with workouts while minimizing the risk of injury—making it ideal for rehabilitation and long-term fitness routines.
A recumbent bike supports your back and places the pedals in front of you, but the seat still has to match your leg length. A position that is too close, too far away, or poorly aligned can make an otherwise comfortable ride feel awkward.
This guide shows you how to adjust the seat, check knee and foot alignment, set your posture, and test the position while pedaling—not just while sitting still.
Quick answer
At the farthest pedal position, your knee should remain comfortably bent—not locked and not deeply flexed.
Keep your hips against the backrest, place the ball of each foot over the pedal, and check that your knees track in the same general direction as your feet. Pedal for several minutes at light resistance before deciding the setup is correct.
A good recumbent bike position allows your legs to move through the pedal cycle without your knee locking, your hips rocking, or your pelvis sliding away from the backrest. It should feel stable at both the closest and farthest pedal positions.
If you are new to the equipment itself, begin with what a recumbent bike is and how its design works. Understanding the forward pedal position makes the adjustment steps below easier to visualize.
Do not chase one perfect angle
Cycling-fit research often uses knee-angle ranges, but measurement methods and bicycle geometry differ. A visible knee bend, stable pelvis, secure foot contact, and comfortable dynamic test are more useful for most home users than trying to reproduce a laboratory angle exactly.
Use this sequence before every first ride on a new bike. Follow the manufacturer’s instructions for the seat lever or adjustment rail, and make sure the seat locks securely before pedaling.
About knee angle
A widely cited cycling review suggests roughly 25–30° of knee flexion near maximum extension as a starting point for conventional cycling fit, but recumbent geometry and measuring conventions vary.[1] For a home recumbent bike, use the range as context—not a rigid prescription.
Seat distance is only one part of fit. Your feet create the contact point through which the legs apply force, so foot placement and knee tracking should also remain consistent.
| Area | What to look for | What to avoid |
|---|---|---|
| Knees | Track in the same general direction as the feet | Repeated collapse inward or flare outward |
| Feet | Ball of foot supported; heel stays stable | Pedaling only through the toes or heels |
| Ankles | Relaxed, controlled movement | Exaggerated toe-pointing to reach the pedal |
| Hips | Remain level and supported against the seat | Rocking, twisting, or lifting to complete a stroke |
The quadriceps, hamstrings, glutes, calves, and shin muscles coordinate through each pedal revolution. See the full explanation of which muscles a recumbent bike works.
Individual anatomy differs. A small amount of natural variation is normal; the goal is controlled, repeatable movement rather than forcing both legs into an artificial-looking line.
The backrest should support you without encouraging a collapsed posture. Think “supported and tall,” not rigidly upright and not slumped forward.
Keep the pelvis at the back of the seat and maintain comfortable contact with the backrest. Avoid sliding forward as resistance increases.
Let the shoulders drop away from the ears. Rest the hands lightly on the side handles or console handles without pulling your torso forward.
Keep the neck neutral. Position a television, tablet, or phone so you do not spend the whole ride looking sharply down or turning to one side.
If your bike has moving arm handles
Keep the shoulders relaxed and elbows softly bent. Adjust the effort so the arm motion does not pull your upper back away from the support. A standard recumbent bike and an elliptical recumbent bike create different upper-body demands.
A position can look correct while the pedals are still and fail once resistance and cadence increase. Use this short test before a full workout.
During the test, confirm all five points:
Once the position is stable, use a structured recumbent bike workout plan to progress duration and resistance gradually.
What the research can—and cannot—tell us
In a study of 15 cyclists using a recumbent ergometer, close, medium, and far seat positions did not significantly change the measured knee abduction or extension moments, while increasing work rate from 60 to 100 watts did increase those moments.[2]
That does not mean seat fit is unimportant. It means discomfort should not automatically be blamed on distance alone: resistance, cadence, foot position, individual anatomy, and existing symptoms can all contribute. Reviews of cycling biomechanics also note that direct evidence linking a single setup parameter to injury risk remains limited.[3]
In a separate study of recreational cyclists on conventional bicycles, changing knee and trunk positions altered perceived comfort, fatigue, and pain during 45-minute tests.[4] That supports testing position dynamically, while also reminding us not to transfer one conventional-bike angle directly to every recumbent bike.
Use the table as a set of fit clues—not as a diagnosis. Change one variable at a time and retest at low resistance.
| What you notice | Possible fit or technique clue | First adjustment to test |
|---|---|---|
| Knee feels crowded at the front | Seat may be too close; resistance may be too high | Move one setting farther and reduce resistance |
| Pulling behind knee or hamstring | Seat may be too far; leg may be overreaching | Move one setting closer and retest |
| Hips rock side to side | Excessive reach or resistance | Shorten the reach and lower the load |
| Feet feel numb or compressed | Straps or footwear may be too tight | Loosen straps and check foot placement |
| Low back becomes uncomfortable | Pelvis may slide forward; backrest may not suit you | Reset against the backrest and reduce effort |
| Neck or shoulders tighten | Gripping handles or viewing a low/off-center screen | Relax the hands and reposition the screen |
Stop and get appropriate advice
Stop riding if you experience sharp pain, new numbness, dizziness, chest symptoms, or pain that persists after changing the setup. If you have an injury, recent surgery, significant joint disease, or a rehabilitation plan, ask the treating clinician how the bike should be adjusted for your situation.
Fit is a product feature
Before buying, compare the stated user-height or inseam range, seat-rail travel, step-through access, seat dimensions, pedal straps, and weight capacity. A bike with the right features but the wrong fit range is not the right model.
Looking for a recumbent bike?
Confirm the current fit range and specifications on each product page.
Far enough that the knee remains slightly bent at the farthest pedal position, but not so far that the knee locks, the toes reach, or the hips rock. Use the five-minute test because static reach alone cannot confirm the fit.
Your knee should retain a visible, comfortable bend at maximum extension. Conventional cycling research often uses roughly 25–30° as a starting range, but recumbent geometry and measurement methods vary. Do not force an exact angle if it causes reaching or crowding.
Possible contributors include a seat that is too close or too far, excessive resistance, rapid increases in training, inconsistent foot placement, or a pre-existing condition. Fit clues can help you test simple changes, but persistent or sharp pain requires appropriate clinical advice.
Maintain comfortable contact with the backrest and keep your pelvis at the back of the seat. You do not need to press yourself rigidly into it, but repeated sliding or pulling forward is a sign to reduce effort and recheck the setup.
Only if the manufacturer’s manual specifically allows it. Stop the pedals first, and dismount if required. Always confirm that the adjustment mechanism is fully locked before riding.
Do not compensate by sitting forward, locking the knee, or pedaling through the toes. Confirm that the seat is installed correctly, then compare a model with a different stated user-height or inseam range.
Comfort begins with fit
Compare seat ranges, access, capacity, resistance, and workout features before choosing your model.
Explore Vanswe Recumbent Bikes →This article provides general educational information and is not a diagnosis, individualized bike fitting, physical therapy, or medical advice. Product specifications, fit ranges, prices, promotions, and availability can change; confirm current details on the linked product or collection page.
Tags